I know—I’ve said this before, but it’s worth repeating:
Stop obsessing over SEO and AdWords.
They’re not a strategy. They’re just tactics.

Think about it this way: back in the day, you wouldn’t walk into a media agency and say, “I just want to do radio,” or “only TV.” You’d ask, what’s the best way to reach the people I want to reach? And the agency would build a media mix to help you get in front of them.

Now? We’ve somehow gotten stuck thinking SEO and AdWords are the only options. They used to be cheap and effective. Now they’re expensive, saturated, and complicated. And if you build your whole marketing plan around one channel? You’ve just created a single point of failure.

I know businesses spending a fortune on AdWords now because they relied on it too heavily. And weaning yourself off that dependency? It’s expensive and painful.

So if a digital agency comes along promising 4x ROI or a magical jump in revenue—be cautious. That’s either inexperience or overconfidence talking.

Big brands don’t just spend on SEO or AdWords. They also invest in social, outdoor, partnerships, sponsorships—you name it. They build a media diet. A balanced approach that gets them in front of their audience wherever that audience actually is.

So here’s the brief:
Who is going to buy my product?
Where are they spending their time?
And how do I get in front of them?

That’s where your budget should go. Not “SEO at all costs.”

Also, let’s not forget—we used to have real conversations about attribution. Now it’s just last-click this, last-click that. We’ve somehow gotten dumber with smarter tech. We’ve gone backwards.

So yes—SEO and AdWords are useful. They still have a role.
But they’re not your strategy. They’re not the business outcome.

Stop chasing the sugar rush. Start asking smarter questions. Build a proper mix. Your business deserves more than just one trick.

In the realm of digital content creation, finding high-quality images that won’t break the bank has always been a challenge for me. That’s where Pexels.com comes in. Offering an extensive library of free stock images and videos, Pexels has become one of my go-to resources for creating blog posts, prototypes, and more. But while I’ve found it incredibly useful, there are a few considerations I’ve learned to keep in mind when using free imagery.

What Makes Pexels.com Stand Out?

Pexels.com provides a vast collection of high-quality, royalty-free images and videos contributed by a global community of photographers. I love how intuitive the search functionality is, and the curated collections make it easy for me to find visuals that fit my needs. Whether I’m looking for a striking banner image, visuals for a blog article, or placeholders for a prototype, Pexels has me covered.

And the best part? It’s free. No subscriptions, no fees—just a simple download button. This accessibility has made it a staple in my toolkit, especially when I need to stretch my creative budget.

The Double-Edged Sword of Free Imagery

While Pexels is a fantastic resource, I’ve noticed that good free images often become overused. Popular visuals can appear across countless websites, which can dilute the uniqueness of a brand. For me, this means being selective about where and how I use free stock imagery.

Some practical applications I’ve found for free images include:

  • Blog Articles: I use them to enhance content with visuals that grab attention and support the message.
  • Prototypes: They make for excellent placeholders during the design phase without committing to paid assets.
  • Internal Presentations: I often use them to add polish to slides without dipping into my budget.

However, when it comes to branding or customer-facing assets, I prefer to invest in unique, premium visuals to ensure my work stands out.

The Importance of Crediting

Even though Pexels doesn’t require attribution, I make it a point to credit photographers whenever possible. A simple nod in the form of a caption or footer not only acknowledges the artist’s work but also aligns with ethical content practices. Supporting creators fosters a positive ecosystem, ensuring that platforms like Pexels continue to thrive.

The Bottom Line

Pexels.com has been an invaluable tool for me as a content creator. Its user-friendly platform and extensive library make it ideal for blogs, prototypes, and internal projects. That said, I’m always mindful of the limitations of free imagery—overuse can diminish a brand’s distinctiveness. And, of course, whenever I use someone else’s creative work, I make sure to give credit where it’s due. It’s a small gesture that goes a long way.

Check it out – Pexels.com

Cover photo by Lum3n: https://www.pexels.com/photo/green-pine-trees-covered-with-fogs-under-white-sky-during-daytime-167699/

Localising content is an excellent way to ensure that users are served more relevant content. But it’s important to make sure that the user experience isn’t disruptive.

Proper localization integrates seamlessly into UI/UX design, making users from diffrent backgrounds and cultural references, feel as if the product was tailored specifically for their region. This article outlines a best-practice approach to building localized UIs, featuring recommendations and insights to guide design decisions.


1. Understand That Localization is More Than Translation

Localization requires adapting every facet of the app—visuals, language, interaction, and layout—to meet regional expectations. Simply translating words is insufficient; effective localization involves ensuring cultural relevance.

“Localization is about much more than just UX design. It’s about crafting cross-cultural products with international UX in mind from the start of the development process.” — Pamela Ghosal

Recommendation:

Start by defining target locales and researching cultural preferences, including language, color meanings, icons, and layout conventions. This way, localization becomes an integral part of the user journey, creating a sense of familiarity and usability for global users.


2. Integrate Localization Early in the Design Process

Localization is most effective when integrated from the beginning of design and development. This “design-led localization” approach allows designers to anticipate cultural needs and adapt the UI early, reducing the risk of rework and streamlining the translation process.

“Integrating translation efforts into the design stage will save you time and money… allowing the design team to seamlessly view and test multiple versions in different languages.” — Gridly Localization Guide

Recommendation:

Adopt design tools and workflows that support early localization, like Figma plugins that sync design changes with translation management platforms. With this approach, designers and localization teams work in sync, ensuring that every UI version is consistent and functional across languages.


3. Account for Text Expansion and Variability

Languages can vary greatly in text length, which affects UI layouts. For instance, German or French text is often longer than English, while languages like Chinese may be shorter. Design with flexibility in mind by leaving ample space around UI text fields.

“As a rule of thumb, your layouts should allow for twice as long phrases, with all text fields and buttons designed with the longer copy in mind.” — Gridly Localization Guide

Recommendation:

Use pseudo-languages or placeholder texts that are double the average length of English content to test your design’s responsiveness. By accommodating text expansion and contraction, you maintain layout integrity across languages, enhancing the UI’s adaptability.


4. Create Culturally Inclusive Input Fields and Icons

When designing forms or icons, consider cultural conventions, which vary significantly. For instance, name fields in some regions may include multiple family names, while icons (such as a “thumbs up” symbol) may carry different meanings across cultures.

“There are many stories of frustration that resulted from culturally insensitive name input fields… Make sure that everything that a user has to input corresponds to local norms and conventions.” — UX Localization Guide

Recommendation:

Research local naming conventions and adapt form fields to accommodate them. When designing icons, choose culturally neutral symbols or consult native users to avoid misinterpretations, ensuring a consistent and respectful user experience.


5. Adapt Layouts for Right-to-Left (RTL) Languages

Right-to-left languages, such as Arabic and Hebrew, require UI adaptations that go beyond reversing text direction. RTL designs may require changes in navigation, icon placement, and directional flows to feel intuitive.

“Supporting RTL languages requires rethinking the layout… In RTL displays, time runs from right to left.” — Pamela Ghosal

Recommendation:

Implement a UI layout that can flip seamlessly between left-to-right and right-to-left formats. By supporting mirrored layouts, you create a user experience that aligns naturally with users’ language habits, reducing confusion and enhancing usability.


6. Incorporate Both Textual and Non-Textual Localization

Beyond text, visual elements such as colors, images, and animations must align with local cultural norms. Colors may signify different emotions or connotations across regions, and images of people, places, or symbols should be chosen to resonate with the target culture.

“Non-textual localization elements include icons, illustrations, photos, and colors… Shopify uses different visuals on their main page in English and Japanese to be more relevant.” — UX Localization Strategy Guide

Recommendation:

Create separate versions of your visual assets for each locale. For instance, adapt color schemes to avoid unintended messages and choose imagery that reflects the target audience’s daily life and culture. These changes help establish a stronger connection with local users, making the app feel familiar.


7. Implement Continuous Localization for Consistent Updates

Since apps evolve, continuous localization enables real-time updates without the need for major translation cycles with each change. By automating the localization process, you ensure that all UI elements stay consistent and up-to-date across languages.

“Following the continuous approach to localization means updating translations as soon as any new content element appears. This keeps translators aligned with the app’s latest features and functions.” — Gridly Localization Guide

Recommendation:

Use a translation management tool that supports continuous localization, allowing translators to track changes, review updates, and maintain consistency across all versions. This approach keeps the UX coherent and prevents outdated content from disrupting the user experience.


Making a Decision: Evaluate Designs for Localized Content

When choosing an approach to localizing your app’s UI/UX, consider the following steps:

  1. Research Target Markets: Understand cultural norms, language preferences, and local regulations.
  2. Assess Layout Flexibility: Test designs for text expansion, RTL support, and adaptability for various input fields.
  3. Evaluate Visual Consistency: Ensure that non-text elements—colors, icons, images—align with local interpretations.
  4. Prioritize Design-Driven Localization: Integrate localization efforts early, ideally during the design phase.
  5. Choose a Localization Management Platform: Select tools that support design integration, continuous localization, and collaboration across teams.

These best practices build a framework for effective localization that goes beyond language to provide a culturally relevant and intuitive experience for all users.


References

https://www.nngroup.com/articles/crosscultural-design

https://www.nngroup.com/articles/store-finders-and-locators

https://www.nngroup.com/articles/mobile-maps-locations

https://m3.material.io/blog/localization-principles-techniques

https://www.gridly.com/blog/ui-ux-app-localization-best-practices

https://www.gridly.com/blog/ui-ux-app-localization-best-practices
Why Your Website Should Be More Than Just a Digital Presence

In today’s fast-paced digital landscape, websites are often viewed as disposable tools rather than valuable assets. At TBST Digital, we believe this perspective overlooks a significant opportunity for businesses to harness their digital footprint to create substantial value. Your website, along with your social media platforms, LinkedIn presence, advertising channels, and email databases, collectively form your digital footprint. These elements, when managed strategically, can become powerful assets that drive your business forward.

The Hidden Costs of a Disposable Attitude

Many businesses invest considerable resources—time, energy, and finances—into creating and maintaining their digital assets. However, without a strategic approach, these efforts can yield minimal returns, effectively wasting valuable resources. A disposable mindset means that these digital tools fail to contribute meaningfully to business growth, often becoming neglected or underutilized.

Strategic Enhancement: Turning Digital Assets into Valuable Investments

Adopting a purposeful and intentional strategy for your digital footprint transforms these assets into valuable components of your business. Imagine selling your company where your website and digital programs are recognized as separate, valuable line items on the sale ticket. This scenario is achievable when your digital assets are strategically developed and continuously enhanced to support and drive business objectives.

Introducing the Digital Maturity Model

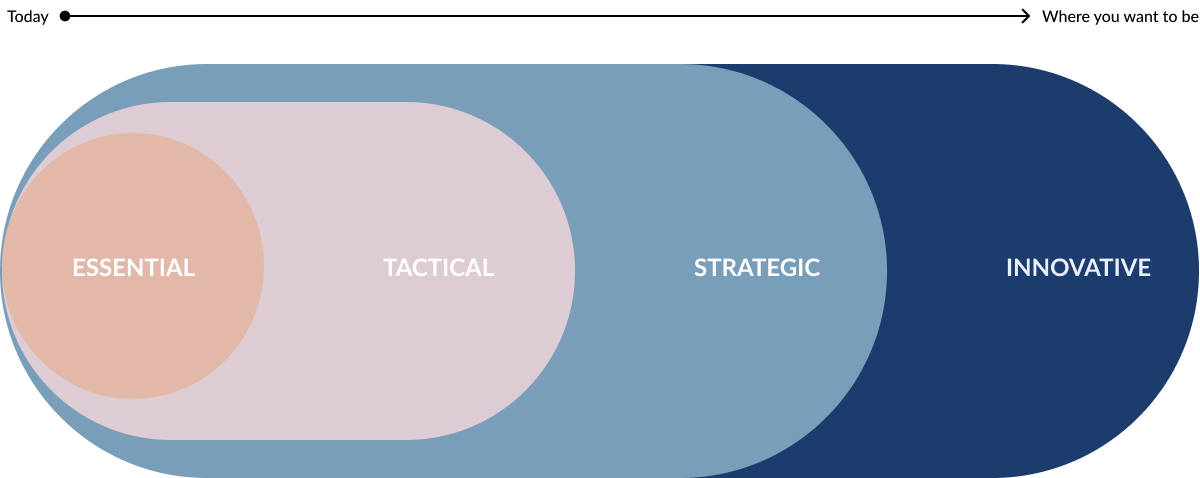
To guide businesses in this transformation, we’ve developed the Digital Maturity Model—a comprehensive framework that facilitates the continuous improvement of your online assets. This model allows you to benchmark your current performance and strategically plan your digital growth. The Digital Maturity Model comprises four key stages:

  1. Essential Stage
  2. Tactical Stage
  3. Strategic Stage
  4. Innovation Stage

1. Essential Stage: Building a Strong Foundation

At the Essential Stage, the focus is on establishing a professional, clean, and easy-to-update website. This stage emphasizes the importance of content over design—content sells the product, and design showcases that content effectively. Key activities include:

  • Basic Design System: Ensuring consistency in colors, typography, and overall design.
  • Essential Website Development: Providing essential information such as services, contact forms, and business overviews.
  • Social Media Setup: Claiming and establishing your presence on key social media platforms.
  • Governance: Implementing governance practices to manage digital assets effectively, preventing resource wastage and ensuring continuity.

2. Tactical Stage: Driving Immediate Results

The Tactical Stage focuses on leveraging digital marketing activities to drive traffic and generate revenue. This stage is characterized by:

  • Analytics Setup: Implementing tracking and reporting systems to measure campaign performance.
  • Performance Media: Managing paid advertising channels like Google Ads and social media ads to ensure profitability.
  • SEO Strategy: Developing a robust SEO strategy to enhance organic search visibility.
  • Performance Pages and Lead Magnets: Creating targeted landing pages and valuable offers to capture leads.
  • Email Marketing and Hygiene Content: Building and nurturing customer relationships through email campaigns and essential content that addresses common customer queries.

3. Strategic Stage: Establishing Long-Term Positioning

In the Strategic Stage, the website evolves to support long-term business positioning and market authority. Key initiatives include:

  • Brand Development: Crafting a strong brand identity that serves as the North Star for all content and marketing efforts.
  • Extending the Design System: Enhancing user experience (UX) to support diverse and engaging content.
  • Hub Content: Producing thought leadership content to establish authority in your industry.
  • Customer Journey Mapping: Analyzing and optimizing the customer journey to guide users seamlessly through your sales funnel.
  • Content-Driven Commerce and Education: Leveraging high-quality content to generate revenue and provide educational value to customers.
  • Multimodal Engagement and Customer Service: Expanding touchpoints with customers and enhancing relationships through superior customer service.

4. Innovation Stage: Leading the Market

The final stage, Innovation, is where your digital footprint actively contributes to your business’s mission. This stage involves:

  • Technology Integration: Implementing advanced technologies to empower customers and streamline operations.
  • Self-Service Economy: Creating applications and tools that allow customers to help themselves, setting new industry standards.
  • Category Ownership: Establishing your business as the authority in a specific category, driving dominance in the market.

The Journey to Digital Maturity

Transitioning through these stages requires time, a well-thought-out plan, and dedicated resources. The Digital Maturity Model provides a structured approach, ensuring that each phase builds upon the previous one, ultimately transforming your digital footprint into a valuable business asset.

By moving beyond a disposable attitude and embracing strategic enhancement, your website and digital assets can significantly increase your business’s value, both in operational efficiency and market positioning. Whether you’re a small business owner or a large enterprise, investing in your digital maturity can unlock new opportunities and drive sustained growth.

Final Thoughts

At TBST Digital, we believe that every business has the potential to elevate its digital footprint into a cornerstone of its success. By following the Digital Maturity Model, you can ensure that your digital assets are not just present but actively contributing to your business goals. Ready to transform your digital presence? Let’s embark on this journey together.